Been meaning to do this for a while, but the BBQ Smoker has been working great. Here's some pics of the final, painted and placed table. I have plans for automating the moisture and smoke in the chamber, but that will have to be on a followup post.
Here's the primed table. A final coat that matched the deck followed.
Next my wife decreed that the terracotta pots had to be painted to look at little less DIY.
I used high temperature BBQ paint.
Turned out pretty well ... I kept the patterns in the pot, but my wife preferred I painted them over too.
I don't nearly travel as much as I used to, but many years of being Super Elite teaches you a few tricks. I'm constantly refining my travel kit for durability, size, weight and function. I thought I'd do a post to share my latest ensemble.
Rule One of travel: Don't Check Bags ... everything here is with that rule front and center.
The Suitcase
The cornerstone of every good travel kit is the suitcase. I've settled on the Zuca Pro, which is a beautiful carry-on bag (watch the video ... you'll be sold). It has organizer bags and a metal frame that has a built in seat. Since I'm a programmer, I'm always on the lookout for electrical outlets in airports. There are always outlets in the hallways, but never any chairs next to them. With the Zuca Pro, I've always got a seat. Don't confuse this with the Zuca Sport, favored by figure skaters. Note: the Zuca is 10" width vs. the regulation 9" width, but I've never been called on it.
The benefit of being a geek is jeans, tshirts and a nice shirt or two are usually all I need. I can get a week of travel in this bag and not have to do laundry.
Also, being a Zuca Pro owner is like being a Harley owner. Whenever you see someone else with one, you're obligated to go over and talk with them and congratulate them on their great taste. Yeah, sad but true.
Pro Tip #1: Don't get the colored versions. I've seen a few in the wild and they appear to chip quite easily.
Pro Tip #2: Don't carry the cover unless you think you're going to be checking the bag. The only valid reason to check the bag is if you're bringing home booze. The cover is nice and protects the zipper pulls, but takes a lot of room.
The Carry-On Bag
I've always been a Targus Backpack man. They make great bags that are incredibly durable. But recently I was given an Ogio Hip Hop Messenger Bag (thank OpenStack) ... and I'm kind of digging it. I much prefer two shoulder straps, but this one has a suitcase slip for going over the carrying handle of the Zuca, which is quite nice.
Suitcase + Carry-On Bag
These two things have to fit together well. They're going to be spending a lot of time together. As I mentioned, the Ogio slips over the carrying handle of the Zuca which is great, but it's top heavy. It can get tiring when you are lugging the two bags for a long trek. I much prefer the front hook on the suitcase where the carry-on rider in front. This keeps the center of gravity low and the two bags nearly balance themselves. Sadly, the Zuca has no provisions for a front hook and most laptop bags are too deep to permit this any more.
Don't do this when you're travelling. It's sad.
Inside The Carry-On Bag
Here's the magic really starts. Only bring what you need, and make sure you bring everything you'll likely need. A tremendous balancing act.
The contents:
Audio stuff ... see below
Travel papers wallet I've had this wallet for a long time. It holds my passport, Nexus card and hotel/car membership cards as well as a stock of customs declaration cards, etc. I'm sure I can get rid of much of this stuff, but I love having it all in one place.
Nexus 7 tablet Now I can save my laptop battery for programming. Movies and reading is all done on this. The 7" screen is the perfect form factor. Note: I don't use phone/tablet cases, the only thing I carry is #8, the plexiglass stand (see below)
Business cards, in a nice professional carrying case (thanks again OpenStack)
Small power brick for laptop. One nice thing about ultrabooks, even the power supplies are smaller.
Samsung Series 9 ultrabook. Best bang-for-the-buck currently. The matte screen is beautiful even if the clickpad and keyboard take a little getting used to. Looking forward to Ubuntu 12.10 to make full use of all the features like the backlit keyboard.
the Ogio bag
Targus tablet/phone stand. This thing is great. Nice solid feel. No need for cases and it sits on your leg nicely.
2 amp USB chargers. 2 amp chargers aren't just for tablets, they also charge your phone faster. It's the way to go.
USB to USB mini cables. Everything I have is USB/USB mini ... nothing proprietary.
Belkin power bar. This thing will make you friends anywhere. It has 2 USB chargers and 3 power sockets. If you're in a coffee shop or airport it's easy to jump in on any available plug. Even better, it has a rotating plug, so it can fit in anywhere (like that crappy outlet under your desk in the hotel room). Magic. It has a surge protector, but I don't care about that.
Lens/screen cleaners. I wear glasses, this is better than carrying a large bottle of liquid that can spill. Individually wrapped.
SIM cards. No more roaming charges. When I'm in the US or Europe, just slip in a different SIM card to get unlimited data and voice. Simple Mobile offers $40 unlimited for 30 days. Perfect. Of course, you'll need to unlock your phone for this (or buy a Google Nexus ... all Google phones are unlocked by default).
Gum.
10BaseT adapter. The ultrabook saves space by using this dongle.
Bluetooth mouse. I prefer a full sized mouse. Bluetooth is great.
Neck brace. FORGET THE HORSESHOE NECK PILLOWS! This $14 5" medical neck brace will keep you head from falling all over the place or your mouth gaping open like John Cusack acting. It's soft enough to compress small too. Best $14 ever invested. Sleep like a baby.
Wallet. Custom made by some guy in Turkey so it would fit my Nexus phone and hold a few cards. Yes, it's larger, but it's my protection on my phone. I've gone the "minimalist wallet" approach before, but the sum total is about the same this way, and it protects my phone.
mini HDMI to VGA adapter. If you're presenting, you need to support VGA ... most AV infrastructure still runs on it.
Cat5 crossover cable adapter. If I need to connect to another laptop/pc without a switch, this crossover adapter makes it easy. No need to carry two cables.
For years I've gone with the large noise-cancelling headphones, but recently turned them in for something smaller. On those noisy flights, I find the in-ear headphones are just as good. However, for activity I've settled on the Sennheiser Adidas PMX 680 back-of-the-neck headphones. Love 'em. They stay in place when I'm scrambling to get off the plane (aisle seats ftw!)
Griffin headphone adapter. Most headphones don't have a mike or click-to-talk buttons. This little adapter provides that functionality. Now I can get the best headphone for me and use it with any smart device (when I'm not using #3)
Splitters and airplane adapters. For sharing and older planes.
That's it ... I'm ready for action. I'll try to edit this post as things change.
The Girl (10yo) invented a board game out of The Boy's Lego set. Turns out it's pretty fun, so I thought I'd share it here.
Simple square board, first one to do a full lap around it wins The Golden Banana. But there are hazards!
The game supports up to four players. To start everyone picks a minifig token.
And everyone rolls a die to determine their starting position behind to flag. For some reason there is only room for three minifigs here, but I'm sure that's easily remedied.
The lead player starts by rolling a single die and moves that many spaces. If they land on a green square, on their next turn they move backwards the die roll. Otherwise they move forwards.
If they land on a slippery square they miss their next turn.
If they land on this particular red square they face The Brothers. You roll a die a on an even roll you get The Wheel. On an odd roll you get The Dynamite.
The Wheel attaches to the bottom of your minifig and you move 2x the die roll. If another player faces The Brothers and rolls an even they take your wheel from you.
But if roll an odd and get the dynamite your head catches on fire and you miss 3 turns. The Brothers can be nasty.
Another hurdle is The Silly Spinner. If you land on this blue square you get to pick another player and stick them to the Silly Spinner. They get so dizzy they get lost and need to start at the beginning again. A terrible fate since there are so many green squares near the start.
If you make it all the way around, you win The Golden Banana and have full bragging rights.
I was pretty impressed. It's a quick, fun game. I'm sure there be revisions to come. The Boy says he likes it better than any of the real Lego board games.
My ceramic pot BBQ Smoker is getting good enough results that I thought I should try and pretty it up a little. So I thought I'd start by giving it a nice table. It was a rainy weekend here in Halifax ... a perfect time to lock myself in the garage and work while the rain streamed down outside.
The design I settled on is loosely based on the free DIY plans you can get on the Big Green Egg website.
My plans were a little more rough. I based them on the dimensions of my gas BBQ and the maximum space I had on the deck to place the finished table.
I knew I was going to paint this to match our patio furniture so I was able to go with cheap rough lumber.
Quick trip to the hardware store and I was ready. I can't praise the Rockwell 48" JawHorse clamping work horse enough. It's an incredible machine!
Circular saw to get my notches in place.
Hammer and chisel to clean them up.
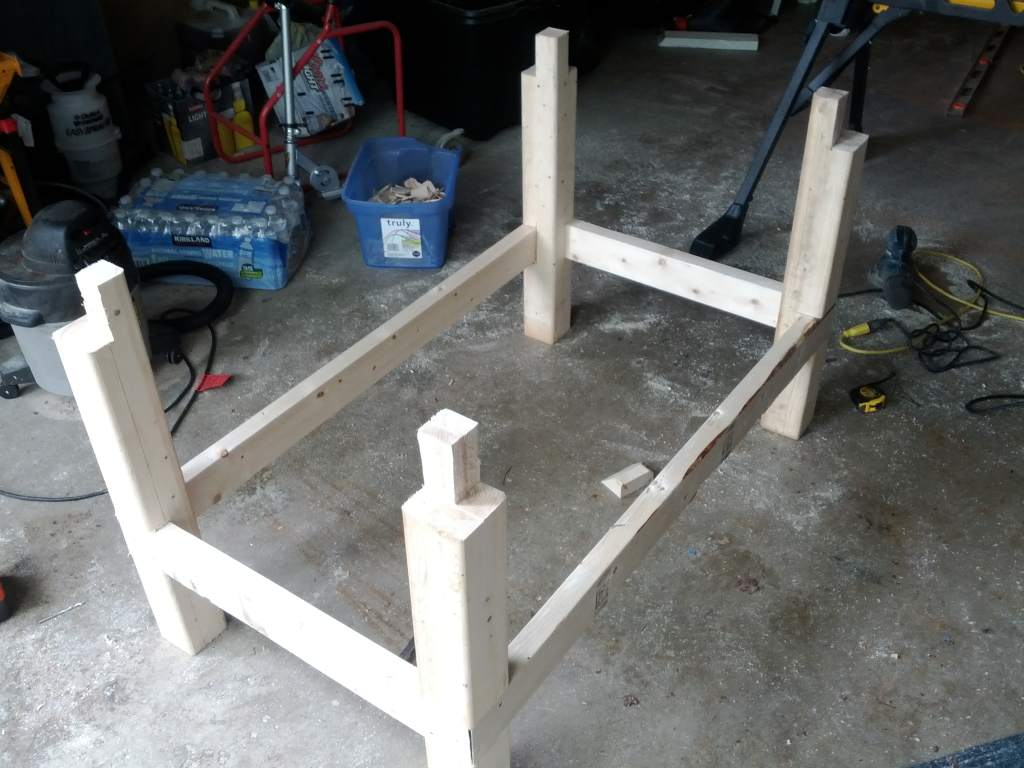
And, before you know it ... four legs. Had to include the height of the caster wheels in the cutoff.
The fit was so tight I hardly needed screws/bolts.
45 degree on the bottom shelf to try and make it a little nicer.
Dry fit ...
Now I could size out the table top. I had 66" max length to work with and settled on 64" at 28" width and 35" high (not too high to make it awkward lifting large, hot chunks of meat).
Some interior bracing is required so I can cut out the hole and not have it too flimsy.
Time to start bolting it together for real. I don't know what I was thinking when I bought these bolt lengths. Yeesh.
The boy helping me get the end caps on.
Bottom shelf braces. The bottom shelf carries all the weight of the smoker, so it needs to be solid.
And some cheap strapping in place for the bottom shelf. Brad nailed into place.
Using some spare bolts to ensure proper spacing. I went a little wide on the spacing to make sure the rain water doesn't pool.
Caster wheels in place. These are 3" with brakes. They can handle 225 lbs each ... plenty. Picked them up at Princess Auto on sale.
Now just to mark out the smoker hole and cut it out.
Bingo ...
Pretty well done. Just need to sand and paint it now. Not sure if I'm going to paint the terracotta pots with some black stove paint. I may.
The whole thing was about $100 and took about six hours to make.
The next blog post I do will be cooking in the finished product. Stay tuned! Although I am thinking about a pulley lift for the smoker top :) We'll see.
I just sent this recipe to a friend and thought others might benefit from it as well.
Deck Cleaner is incredibly expensive, but it's very easy to make yourself.
256 oz Water (4 quarts or about 4L)
64 oz Bleach (the cheap stuff from Walmart)
2/3 cup of liquid dish detergent (cheap stuff from Walmart)
1 cup of TSP (any paint shop, walmart, kent, etc)
Give it a good mix ... I find warm/hot water helps the TSP dissolve. I like to use one of these on my drill.
Spray it on (not direct sunlight, it'll dry too quickly. Early morning or evening is best), let it sit for 10 min and then scrub with deck brush. Spray off with hose.
It has bleach in it, so watch out for siding or anything you don't want to get discolored (same as normal deck cleaner)
Started with the injection ... really got to work the needle around to make sufficient pockets in the meat.
The Mustard Moisturizer
The Seasoning Blend. Cooking 101, never measure your ingredients over the bowl. When I'm doing curries or rubs I prefer the plate method ... easy to double check your proportions and you can always correct mistakes.
Moisturized ...
Rubbed and oiled ...
Sand nice and hot in Version 6 ...
And we're off and running ...
After 3hrs (130F)
The Wrapping Mixture ...
The APL BBQ Sauce (which is really awesome even by itself, let alone as a base) ...
After 6 hrs (160F) ...
Nearly cooked at 9hrs, 193F exactly ... Foiling and with the Wrapping Mixture, ready to rest in the cooler.
Apple Spray ...
About 12hrs total ... done! This is after a last re-seasoning and with the BBQ Sauce Glaze hardened.
The Version 6 Smoker
Worked like a charm! All the efforts to increase the heat flow to the top chamber worked perfectly. The temperature held at a perfect 250F the whole cook. It was truly set and forget. I also used a lot more sand than previous times. This made a big difference. No blue smoke and the cooker recovered to the hold temperature much faster after the lid was opened. I just need to refine the construction a little and make a table for it. Very happy with the state of it right now.
Final Thoughts on the Recipe
Not. Worth. The. Effort.
Sorry.
I would have loved to say this was the most phenomenal thing in the world and the apple flavor dominated the pork ... but it didn't. In fact I found very little difference between all this song and dance and my more basic seasonings. Also, the portions for each of the ingredients are way too high. I had lots of waste.
That said, the APL BBQ Sauce base is something I'll use again and the rub was pretty good.
The resting in the cooler and plastic wrapping the meat is a very good technique as well. I kept the temperature probe in the meat during resting and it increased a solid 10F during the rest to peak at 203F. Pretty neat.
A fun experiment with mixed results in my opinion, but that's what this game is all about.