Note: I'm using BBQ in the proper sense, not to be confused with the grilling that most people do on their propane gas grills. BBQ is low and slow. It's the process of putting smoke flavor on large cuts of meat and slowly bringing the meat to an internal temperature of between 130F to 200F (depending on the cut and variety). Most classic BBQ is a cut of meat like a beef brisket or pork shoulder. Of course, you can also do chicken and ribs in a smoker, but it's a shorter cook time so the insulating power of your smoker isn't as critical. I'm talking 8-16hrs of cooking here. Generally we want to maintain an air temperature of between 200F-250F with 220F optimal. We want to bring the internal temperature of the meat to about 200F in order to break down the collagen in the meat without cooking the crap out of the outside.
The problem is, these ceramic cookers are about $1000+ for anything half decent. Too much for me to experiment with something I may not get into long term. I needed to start cheap and work my way up as my experience grew.
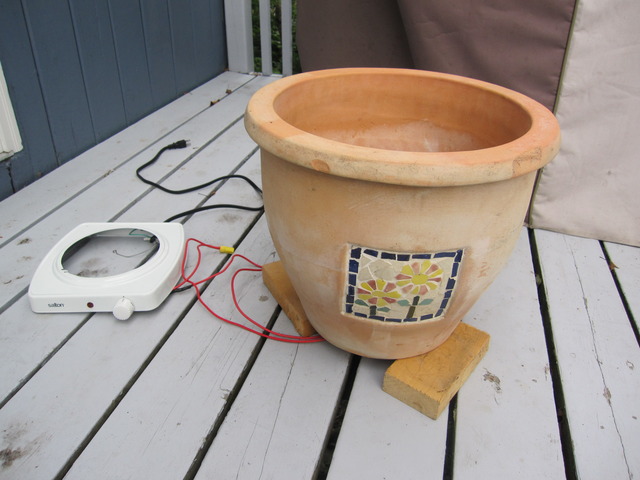
That's when I saw the famous Alton Brown special ...
So, off I went to get some pots. $40 for each pot. $10 for a hot plate at XS Cargo and I was ready to go.
Version 1
Without getting too verbose, the process is very straightforward. I basically mimicked the Alton Brown approach with slight modifications.


The result. It was pretty good, but had a lot of flaws:
- The interior of the smoker was a mess. Fat everywhere. Nearly ruined my heating element. The first lesson of all this ... burning fat is nasty. Now don't get me wrong we need to have sizzling fat ... it's a core part of good BBQ thanks to the Maillard Reaction. Getting that fat in the air and landing on the meat is what makes the charcoal fanatics scream that charcoal is better than electric. The reality is that The Maillard Reaction is what makes it good. Charcoal by itself adds no flavor to food. If it does, you're doing something wrong (like using easy light charcoal). The problem is when too much fat hits the coals and flares up or turns into an acrid smoke. That can leave a bitter taste on your meat. You want the place where the fat lands to essentially be the same temperature as the air you're cooking in: about 220F. We'll come back to this.
- Temperature control. Having to manually adjust the thermostat on the element as the ceramic heats/cools due to wind or whatever is a pain in the butt (no pun intended). There had to be a better way.
- The wood chips were smoking too fast. I was soaking the chips as well, but being nearly directly on the element was a large burst of smoke then nothing.
- Wiring wasn't ready to handle this high heat.
Version 2
Buffed up the wiring with some teflon coated oven wire and high temperature heat shrink tubing.
A note about smoke. Meat will take smoke up to about 160F ... after that your smoker is essentially a fancy oven. You can wrap your meat in aluminum foil to keep the moisture in and not worry about it. Also, you don't want to over smoke your meat and watch the moisture too, moisture and smoke can cause creosote which is very bad for you and tastes even worse. However, most of the time people experience creosote in BBQ is by using green hardwood or using too low a temperature.
So ... Version 3
I wanted to get the isolation between the heat source and the meat. So I put a pan in between. I had read that fruit juices like cranberry, pineapple or apple can put a nice taste on the food. We did some modifications (these picture are after many many smokes in the cooker. It didn't always look this rough)

Expanded the top tray to support the water pan (I'll explain why is looks so dirty later)

The meat would sit just over the water pan. The juices would fall right into the liquid and the moisture would help cook the meat ... in theory.
A heat shield to keep the wood chips off the direct heat.
The results:
- Much lower temperatures in the top chamber. Most of the heat was being forced out of the crack between the two pots due to the pizza pan. Harder to control the heat.
- The liquids were constantly boiling dry and burning. Whenever I'd top it up I'd lose the heat in the cooker since it had to re-heat the liquid again.
- The moisture was causing the smoke on the meat to be much more black.
All in all, not a very good result.
Version 4
Switch from juice to sand. And not soaking the wood chips. Having sand in the water pan did a couple of great things:
- Steady heat in the cooker,
- the Maillard Reaction was back,
- Nearly no moisture in the chamber.
The downside was the heat from the element was still blasting against the bottom the sand pan and making the sand as hot as the surface of the sun. The fat was smoking into a nasty concoction long after the wood chips were finished. Wood smoke should be a nice blue color. Fat smoke is white. Some white smoke is good. Billows of it ... not so much.
But I still couldn't get the heat to the top of the chamber effectively.
Version 5
I picked up a dual probe, AC-switched PID-based temperature controller from Auber Instruments.

- I cook. Temperature control is the cornerstone of good cooking. I use this for more than just BBQ (such as Sous Vide).
- Regardless of what kind of smoker I have, this or a BGE, most cooks buy one of these devices. The most popular being The Stoker. This is cheaper, more versatile and does the same thing.
Version 6
So, I needed to tackle the two remaining problems:
- Too much heat directly onto the sand
- Not enough air flow to the top chamber.
Heat deflectors are common items with BGE owners ... there are commercial and home made ones.
This weekend I made my latest changes. I removed the pizza pan and put the sand bowl on a set of screw legs. Additionally I put the wood pan on a tray above the element.

This site directly on the hot plate chassis making it easy to remove as a single unit.


Next weekend I hope to try it out ... stay tuned!